Everything You Need To Know About Junk Journal Signatures
Signatures are one of the most important elements when creating a beautiful and functional junk journal. After all, without any pages in your journal, you wouldn’t have anything to write on!
But if you’re new to making junk journals, you might have burning questions, such as:
- What are signatures?
- How many sheets of paper should you use for each signature?
- And other than writing paper, what else can you use as pages?
Today, I’m covering all of this and more. Let’s dive in!
What are signatures in a junk journal?
A signature is a collection or group of papers you bind together to make a journal. You might have heard people refer to their journals as having one signature, two signatures, or three or more signatures. So these would be one collection of papers, two collections of papers, three collections of papers and so on.
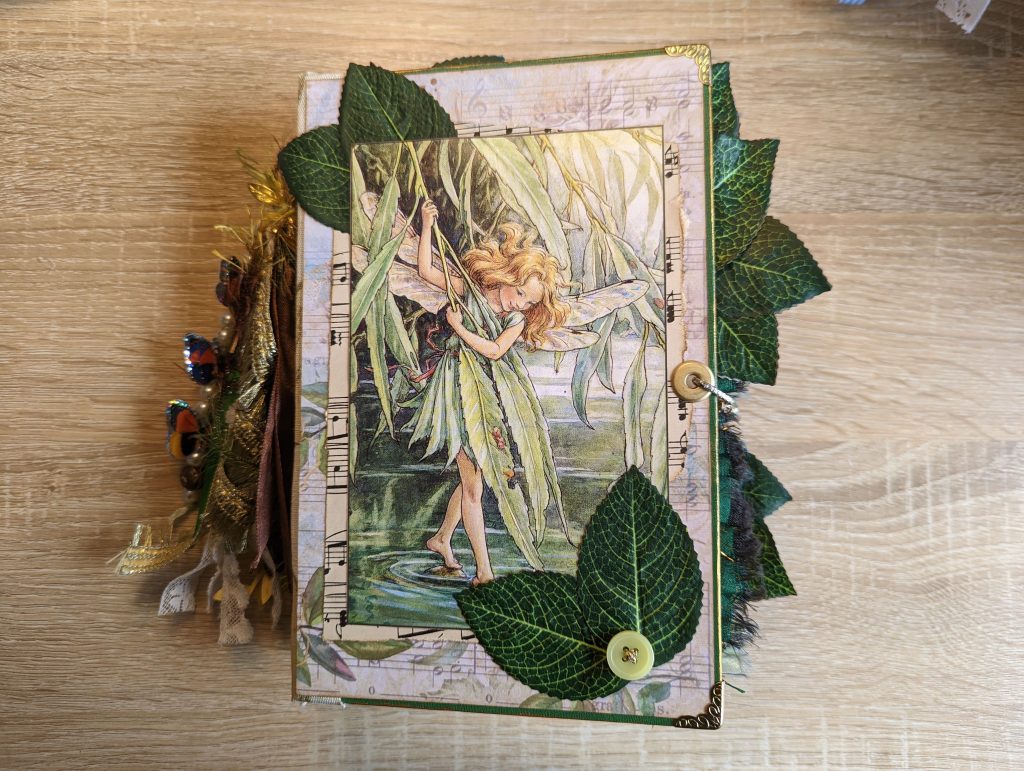
Take my journal shown in the photo below, for example. This one has three signatures or three collections of papers.

READ NEXT: Junk Journal Definitions & A-Z Junk Journal Glossary For Beginners
How to make signatures for your junk journal
To make the simplest signature possible, all you need to do is fold sheets of A4 or letter-sized paper in half and insert them inside one another. This is your signature or collection of papers.
Once you get more experienced with making journals, you might want to experiment with your journal pages and signatures. For example, instead of folding a piece of paper exactly in half, you could fold it into thirds or quarters to create interactive fold-out pages.
You can also experiment with different-sized papers, tearing instead of cutting paper and adding tip-ins. More on this shortly.
You don’t even have to make your signatures out of paper if you don’t want to!
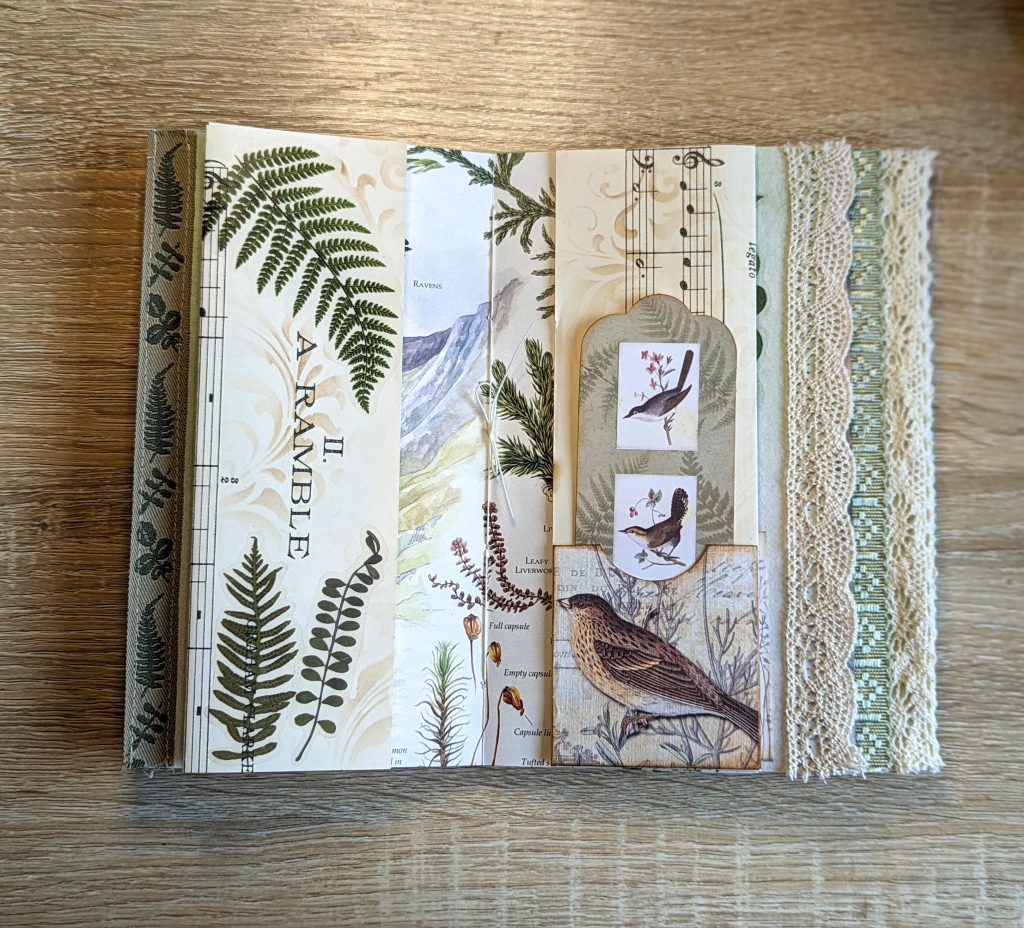
I once made a three-signature “Enchanted Woodland” journal, which had two signatures full of writing pages on either side of the middle signature, which was a fun junk journal insert I made from envelopes.

READ NEXT: 14 Creative Things To Do In A Journal Or Notebook
How many pages to use for your signatures
How many pages you should use for each journal signature is one of the most widely debated discussions throughout the junk journal community. As with all things junk journal-related, there are no rules or right or wrong answers.
That said, I often aim for around 8-12 sheets of paper per signature, which creates 32-48 sides of journaling space per signature.
If I’m using lots of thin paper, I’ll use more of it. Whereas, I’ll only use 8 sheets of paper if one or two of them are thicker, such as good-quality envelopes or cardstock.
You also need to bear in mind how much ephemera you’ll add to your journal and how much embellishing you plan on doing. If you add lots, you may want to use fewer papers to avoid having a “gator-mouth journal”.
I recently asked in my Facebook group how many papers everyone uses in their signatures and I had a wide variety of responses. But generally speaking, the consensus was between 5 and 15 sheets of paper – depending on many of the things I’ve already covered.
But a couple of ladies said something very wise indeed, which is to trust when it feels right to you and to keep practising until you get the right balance for your needs and preferences.
Essentially, yay for no rules! That’s just one of the many reasons why I love junk journals.
READ NEXT: Easy Junk Journal Embellishments – 20+ Examples & Tutorials
Ideas for pages in your junk journal
Speaking of different paper thicknesses, one of the most fun things about junk journals is the freedom to use pretty much whatever you want as journal pages.
Here are some examples of things you can use:
- Junk journal digitals: Ideally, you should use a high-quality printer setting and 100 GSM Presentation Paper for the best print-outs. This is the paper I use.
- Plain paper: Why not experiment with a mix of coloured, plain, tea-stained and dyed papers?
- Lined or dotted paper: You could repurpose these from old notebooks.
- Book pages: Both text and illustrated; you can even fold these up to make pocket pages.
- Maps and music sheets: Instead of cutting large ones down to size, why not fold parts of them in to create pockets and fold-outs?
- Ledger paper and other vintage papers: These make fun additions to your journals – especially if they have interesting textures and typography.
- Envelopes: You’ll have better luck with high-quality ones – especially if you want to use them as pocket pages.
- Scrapbook paper or cardstock: Be wary of poor-quality ones that crack when you fold them.
- Greeting cards: These make sturdy pages, which are perfect for attaching pockets and other ephemera onto.
- Paper doilies: Either for writing on or folded up as pocket pages.
- Thick wallpaper samples: These make beautiful pages if one side is illustrated and the other is plain for writing on.
You might also want to experiment with tip-ins. These are extra pages you add to your journal, but you don’t stitch them into the signatures themselves.
For example, say you’ve added an envelope to your signature. On one side of the signature, you have the envelope part itself to use as a pocket page and on the other side, you have the envelope flap. By folding a piece of paper in half and glueing it on either side of the flap, you’ve added two sides of writing space to your journal. This is known as a tip-in.

READ NEXT: 10 Junk Journal Page Ideas To Inspire You
How many signatures to add to your junk journal
You can have as many signatures as you like inside your journal. If you’re new to making junk journals, I’d start with one signature so that you can get used to the binding process. Once you’re more experienced, you can start experimenting with more signatures.
I personally choose only to do one or two signatures as I get bored if I spend too long working on a single journal. But… I know some people who’ve done a whopping 8 signatures in one journal before!
However many signatures you choose to add to your journal, you need to make sure your spine has enough room for them all. Otherwise, you might end up with a “gator mouth”.
But don’t let this hold you back from being creative! There are always ways to fix or change something with a junk journal, such as the time I needed to replace my spine with a bigger one to fit all my signatures.
READ NEXT: How To Make A Junk Journal From Scratch (Step-By-Step)
How do you stitch signatures into junk journals?
You can use many different binding methods when making your journals, but most people (including myself) start with a 3-hole pamphlet stitch. It’s relatively easy to learn and works just fine for most journals.

Once you feel comfortable with this binding method, you might want to try a 5-hole pamphlet stitch next, which is similar but usually more secure.
Or… you can experiment with all kinds of methods – from elastic and twine binding to using buttons!
READ NEXT: 10 Junk Journal Binding Ideas & Tutorials To Inspire You
What should come first: the cover or the signatures?
Here’s another widely debated discussion: what should come first – your junk journal cover or the signatures? Honestly? It depends on what you prefer.
I prefer to make my cover first so I know how many signatures I can fit inside it and what size the pages should be. Making my cover first also helps me finalise the overall look and feel of my journal.
I also prefer to bind my pages into the journal when they’re undecorated because they’re not as heavy or chunky compared to when you add the ephemera and embellishments.
However, some crafters prefer making the ephemera and pages first, so they know what size the cover should be and what size spine they should have.
I’d suggest trying both methods to see what works best for you.
READ NEXT: 21 Junk Journal Cover Ideas To Inspire You
Read More About Junk Journals
Making junk journals is one of my biggest obsessions right now, so I have lots of other blog posts you might want to check out, such as:
- FAQs About Junk Journaling: 20+ Tips You Need To Know
- What is a Junk Journal?
- Junk Journal Definitions & A-Z Junk Journal Glossary For Beginners
- How To Start Junk Journaling: My Top Tips & Ideas For Beginners
- How To Make A Junk Journal From Scratch (Step-By-Step)
- 35+ Types Of Junk Journals You Can Try Making
- Junk Journal Supplies List & Where To Find Them
- The Intriguing History Of Junk Journals
I hope I’ve been able to answer all the questions you had about signatures. But if you still have questions, please leave me a note below. I always reply!
Did you like this guide to junk journal signatures? Why not pin or bookmark it now, so you can read it again later?

Junk Journal Toolkit
📦 What do I need to get started?
If you’ve got paper, glue, scissors and something to bind your pages with (like a needle, thread and an awl or pokey tool), you’re good to go! Check out my essentials vs. nice-to-have supply list for more info.
🤯 I’m overwhelmed by tutorials and ideas. Where should I start?
Start with my free Mini Junk Journal Masterclass. It walks you through the process step-by-step. Even though it focuses on a mini journal, the same tips apply to any size journal.
❓ I don’t understand the terminology. Can you help?
Absolutely! My A–Z Junk Journal Glossary breaks down all those confusing terms and acronyms. Jargon be gone!
🪡 How do you keep your binding neat?
I use my bookbinding cradle to line up my holes and avoid punching too far through the pages. Smaller holes give a neater and more secure binding, and I use this thin upholstery thread for a cleaner finish.
🧵 Do I need a sewing machine?
Not necessarily! A basic sewing machine is helpful for making fabric-covered journals, but strong fabric glue can work just as well. If you stick to paper-based journals or folios, you don’t need one at all. I like the sewn look and making fabric-based journals, so I personally use a simple machine (similar to this) that’s lasted me over 10 years – it’s a trusty part of my toolkit.
🖼️ What digital papers do you use?
I use a mix of my own designs and other favourites. You can see examples here. New to digitals? Check out my mega bundle for a big saving on some of my designs or sign up for my Mahalo Clubhouse membership to get brand new digitals sent to you every month.
📜 What’s the best paper for printing digitals?
I use this 100 GSM Presentation Paper for vibrant and high-quality prints.
🖨️ What printer do you recommend?
I love my Epson Ecotank. It’s affordable, reliable and the ink lasts ages. I used to spend £30 a month on ink – now I refill just once or twice a year for under £30. While I haven’t used it myself, some other crafters recommend the HP Instant Ink program.
🖇️ What glues do you use?
My go-tos are Collall All Purpose, Cosmic Shimmer and Beacon 3-in-1. Here’s how I use each one.
📖 What books are best for junk journaling?
I love using second-hand nature and botanical books. Here are some great titles to look for next time you’re thrifting.