DIY Antique Writing Folio: Upcycling Old Books Idea [Video]
Today, I’m sharing instructions, ideas and inspiration for a DIY vintage writing folio you can make by upcycling old books.

Hands up if you love all things vintage and antique. Hands up if you love writing letters to your loved ones. And finally, hands up if you love old books and want them to last forever.
I’m assuming you put your hands up three times just then (whether figuratively or literally).
That’s what inspired me to share today’s make: to inspire my fellow old souls.
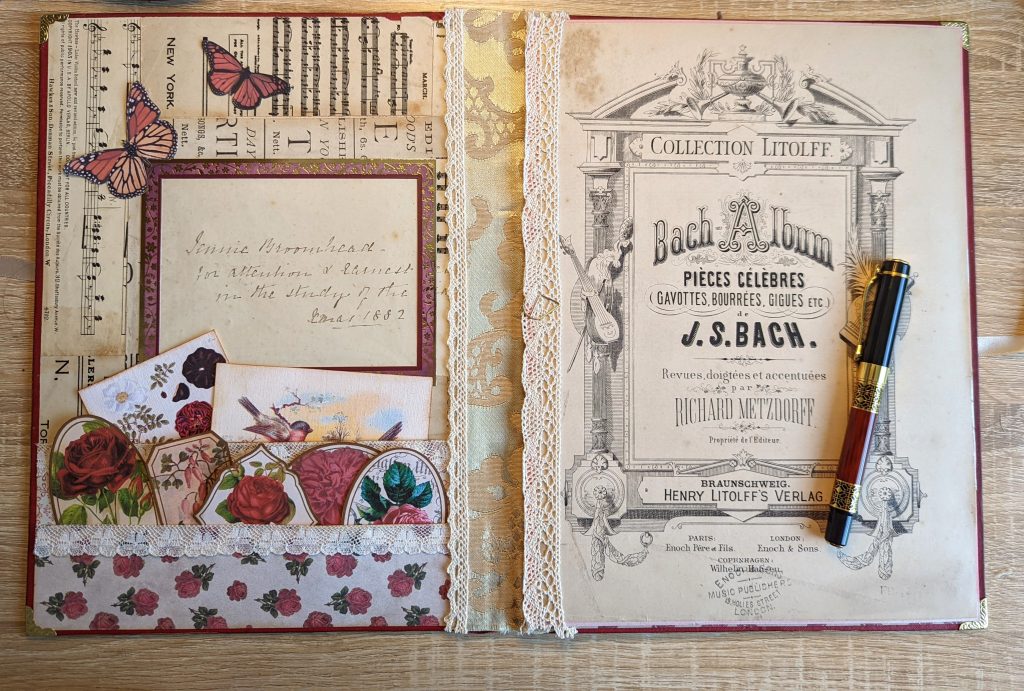
I found an antique music book in a thrift store a couple of years ago, which had an incredible red cover with gold inlay. But it had already lost most of its pages inside and the spine was just barely hanging on.

I knew that I could give it a new lease of life, so I held onto it until the perfect project idea came along.
In July 2022, we hosted a collaboration in our Facebook group (this one right here!), which was all about “interesting facts about July”. As July’s birthstone is ruby, I knew I wanted to make something related to that.
And then I remembered about the ruby red music book!
A few hours later, I’d completely transformed it into a vintage writing folio. Want to know how I did it? Read on for some written instructions and a video showing my entire process. Happy reading and watching!
RELATED: Easy DIY Secret Storage Book Box
DIY Vintage Writing Folio
Supplies You’ll Need For This Upcycled Book Project:
- An unloved book you want to upcycle
- Strong fabric (e.g. cotton, muslin, etc)
- Crochet or lace trim
- Ribbon or twine
- Cardstock or scrapbook paper (you could also print digital papers onto cardstock)
- Writing paper and envelopes
- Glue
- Scissors
- Hole punch
- (Optional) Scoring board and tool
- (Optional) Book corners and other embellishments
Written Instructions
Step 1: Clean the book cover.
If you’re working with an especially old book, you might want to clean up the cover slightly first. I lightly rubbed a baby wipe across mine and you should have seen the colour difference!
Step 2: Create a flip out.
To create a flip out inside your folio (so you can add more pockets and a removable notepad), you’ll want to use scrapbook paper or cardstock.
Cut your paper to the height you want and two inches wider than what you need.
Score the paper on the left-hand side (at 2 inches) and fold it along your score mark to create a flap. Glue this onto the inside of the back cover.
You might also want to decorate the front of your flip out. I wanted to salvage the antique music sheet cover in my project so I glued that onto the front of my flip out.
Step 3: Cover the inside front and back covers of the book.
Now it’s time to cover the inside front and back covers of your book – both for aesthetics and to hide the flap you just glued inside it.
I used scrapbook paper on my inside back cover. But I wanted to “preserve” an inscription on the inside of the front cover, so I collaged around it and finished it off with a paper frame.

Step 4: Make your pockets.
To keep your stamps and envelopes safe, you’ll want to make some pockets for your writing folio.
Using cardstock or scrapbook paper, cut out some rectangles for the inside front and back covers.
It’s up to you how wide or deep you make your pockets. Just make sure they don’t get in the way of where your spine will go.
Affix your pockets into place by glueing around three sides of each pocket.
Step 5: Create a new spine using strong fabric.
If your book has totally fallen apart or has a weak spine, then you can create a new one using strong fabric, such as cotton or muslin.
Cut two strips of fabric, which are each the length of your book and roughly 2 inches wide.
Starting on the inside of your folio, glue one of the strips of fabric onto the inside back cover and inside front cover (taking care not to eat into your pockets too much).
Repeat this on the outside of the book; this time also glueing the centre of your fabric so that it sticks to the other piece of fabric inside the book.
For a tidy finish, you might also want to add some lace or crochet trim along the edges of your fabric spine.
Step 6: Make a removable notepad.
Measure another piece of cardstock or scrapbook paper that’s the width of your writing papers and two inches in height.
Fold it in half and over the top of your writing paper. Hold everything in place with paper clips.
Punch two holes through your papers and cardstock and tie them together using ribbon or twine. This is your notepad.

Next, glue two sides of another piece of cardstock or scrapbook paper (roughly 1-inch in height) to the back of your flip out. This will create a “bellyband” for you to slip the top of your notepad into so that it’s removable.
Note: Make sure you leave enough room for your papers to slip into your bellyband when you glue it into place!
Step 7: (Optional) Add book corners and extra embellishments.
You should now have the base of your folio completed. Now for that extra special finishing touch! It’s up to you what embellishments you want to add.
For mine, I added some butterfly fussy cuts inside, as well as some lace to the top edges of my pockets.
I attached a red and gold cabochon to the outside of my folio and I also added some gold book corners to all four corners of my book cover as they were quite damaged.

I then finished everything off with some gold gilding paste around the edges of the folio to make it look more luxurious.
When you’re finished, you might want to tie some ribbon twice around your folio and finish it off with a bow.
Video Tutorial
Or, if you’re a visual learner, check out my video to see exactly how I made my DIY writing folio:

I hope you enjoy upcycling an old book to make a DIY writing folio. Upcycling and repurposing old and unloved things is such a therapeutic and rewarding process. Enjoy every minute of it!
Discover More Easy Upcycling Projects
- Why You (And I!) Should Turn Our Trash Into Treasure
- 21 Genius Ways To Upcycle Old Books
- Easy DIY Secret Storage Book Box
- DIY Antique Writing Folio: Upcycling Old Books Idea [Video]
- Quick & Easy DIY Wrapping Paper Using Book Pages
- How To Make A Junk Journal From Scratch (Step-By-Step)
- Quick & Easy Upcycled Map Coasters
- Quick & Easy DIY Love Map
- How To Make Paper Flowers Using Maps & Book Pages
- Pretty DIY Map Art: 6 Easy Projects You’ll Love Making
- Quick & Easy DIY Key Holder (Using A Picture Frame!)
- Cheap & Easy DIY Dry Erase Board (Using A Large Picture Frame!)
- Easy DIY Apothecary Jars For Halloween [Free Printable]
Did you like this tutorial and upcycling old books idea? Why not pin or bookmark it now so you can read it again later?

Junk Journal Toolkit
📦 What do I need to get started?
If you’ve got paper, glue, scissors and something to bind your pages with (like a needle, thread and an awl or pokey tool), you’re good to go! Check out my essentials vs. nice-to-have supply list for more info.
🤯 I’m overwhelmed by tutorials and ideas. Where should I start?
Start with my free Mini Junk Journal Masterclass. It walks you through the process step-by-step. Even though it focuses on a mini journal, the same tips apply to any size journal.
❓ I don’t understand the terminology. Can you help?
Absolutely! My A–Z Junk Journal Glossary breaks down all those confusing terms and acronyms. Jargon be gone!
🪡 How do you keep your binding neat?
I use my bookbinding cradle to line up my holes and avoid punching too far through the pages. Smaller holes give a neater and more secure binding, and I use this thin upholstery thread for a cleaner finish.
🧵 Do I need a sewing machine?
Not necessarily! A basic sewing machine is helpful for making fabric-covered journals, but strong fabric glue can work just as well. If you stick to paper-based journals or folios, you don’t need one at all. I like the sewn look and making fabric-based journals, so I personally use a simple machine (similar to this) that’s lasted me over 10 years – it’s a trusty part of my toolkit.
🖼️ What digital papers do you use?
I use a mix of my own designs and other favourites. You can see examples here. New to digitals? Check out my mega bundle for a big saving on some of my designs or sign up for my Mahalo Clubhouse membership to get brand new digitals sent to you every month.
📜 What’s the best paper for printing digitals?
I use this 100 GSM Presentation Paper for vibrant and high-quality prints.
🖨️ What printer do you recommend?
I love my Epson Ecotank. It’s affordable, reliable and the ink lasts ages. I used to spend £30 a month on ink – now I refill just once or twice a year for under £30. While I haven’t used it myself, some other crafters recommend the HP Instant Ink program.
🖇️ What glues do you use?
My go-tos are Collall All Purpose, Cosmic Shimmer and Beacon 3-in-1. Here’s how I use each one.
📖 What books are best for junk journaling?
I love using second-hand nature and botanical books. Here are some great titles to look for next time you’re thrifting.
Lovely idea. Im enjoying exploring your blog (Birthday giveaway)
Aww, thank you Linda! I’m so pleased you’re enjoying having a look around here. Best of luck for the giveaway! xoxo