How To Make Paper Flowers: Easy DIY Swirl Roses
By now, I’ve lost count of how many tutorials there are online about how to make paper flowers. From simple 2D shapes kids will love making to incredibly fancy (and realistic looking!) paper roses.
If you’re new to paper crafts then you’ll love how simple these DIY paper roses are to make.
Here’s What You Need:
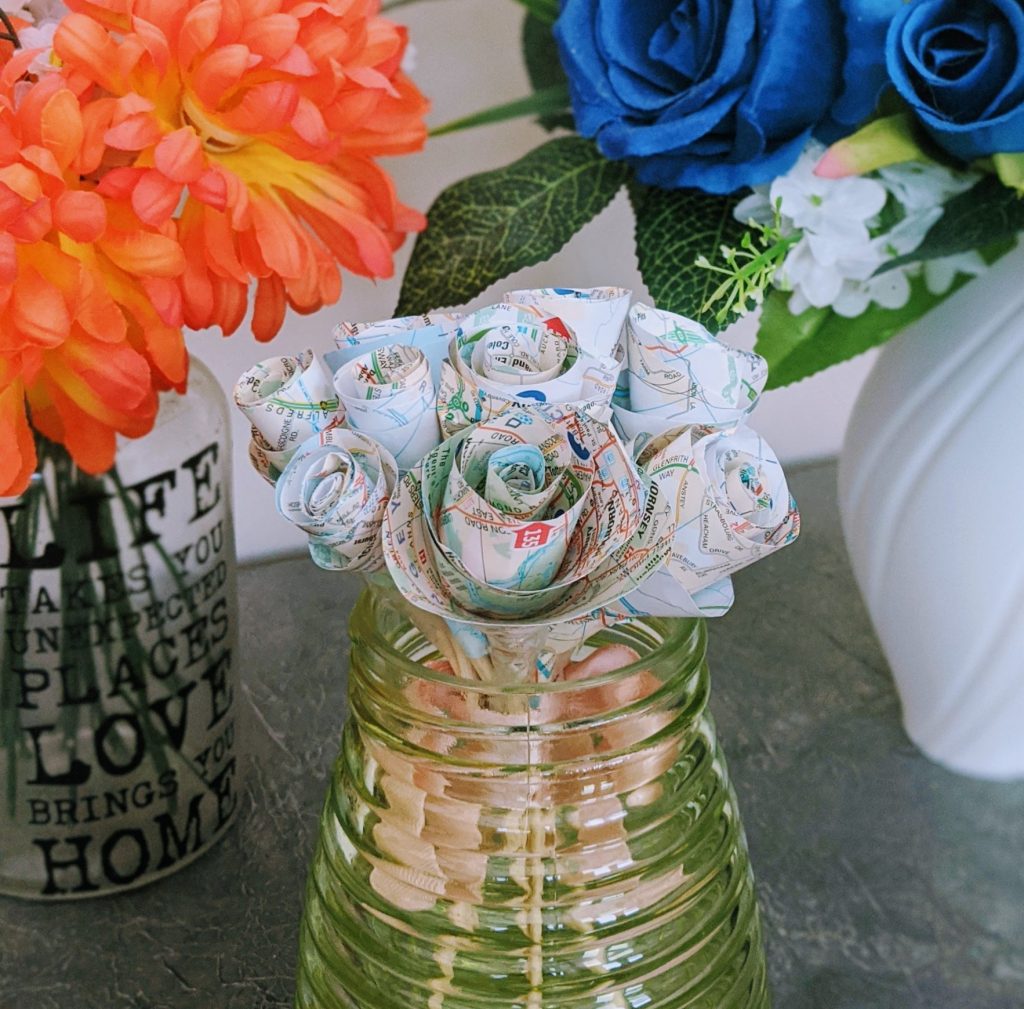
- Paper or cardstock (I used old road maps for mine as part of a DIY map art project)
- Scissors
- Glue
- Sellotape
- Kebab sticks or cake pop sticks (you could also use green pipe cleaners or even toothpicks for a teeny tiny bouquet)
- (Optional) Green paint, coloured ribbons and brown packing paper
- (Optional) Vase, bottle or jar for displaying your flowers
How To Make Paper Flowers – Easy DIY Swirl Roses
Although you could spend a lot of time making fancy paper roses, you can also get a lovely effect in just one afternoon thanks to the swirl technique!
Here’s how to do it:
Step 1. Cut a large circle in your paper or cardstock.
TIP: One sheet of A4 should be enough for two paper roses.
Step 2. Start cutting the circle in a swirl formation.
Stop cutting when you reach the inner circle leaving roughly one inch of paper uncut.
TIP: Try to keep your swirls even for the prettiest paper flowers.


Step 3. Roll your paper into a flower shape.
Starting at the end of the swirl on the outer edge, roll your cardstock or paper in tight rolls following the swirl pattern.
Continue rolling until you only have the uncut end left and add some glue to this uncut end.
TIP: A glue stick works just fine if you don’t have a glue gun to hand.


Step 4. Finish your paper flowers.
Gently release your grip on the rolled part of the flower so it unravels ever so slightly. But only a little; this is one instance when you don’t want to lose your rolls!
Wrap the glued end around the bottom of your flower. You should find that the end is now slightly pointy.


From here, you have a few options depending on what you want to do with your paper flowers.
If you want to decorate a table or shelf with them or maybe drop them on the floor for someone to follow, then you’ve just got one last step:
Cut the pointy end of the flower roughly 0.5 centimetres from the bottom so that it has a flatter edge making it easier to stand your flowers upright on their own.
But if you want to turn your DIY paper roses into a small posy or bouquet, follow these steps:
Cut the pointy end of the flower; this time so it has a small hole in the bottom of it to thread your stick through. These will be your “stems”.

If you want to make your stems look more realistic, then you could paint them green, wrap green ribbon around them or use green pipe cleaners instead. But if your roses will be hidden inside an opaque vase then you can skip this step.
Poke your stick through the hole you’ve just made. But be careful not to poke the stick in too much or too forcefully as you might push your inner swirl out of the flower!
TIP: You shouldn’t need to push your stick more than half an inch inside.
Glue or sellotape your stick in place. Don’t worry if the ends look a little messy right now because it’s time to decorate with some pretty ribbon!
Wrap an elastic band around your flowers so that you’ve got a sturdy posy or bouquet and tie the ribbon around it afterwards to cover the band.
TIP: Match your ribbon to the occasion for that something extra… pastel pinks, yellows and greens for spring, reds and golds for Christmas or just go with your recipient’s favourite colour!
Step 5. Display your flowers.
Lastly, you’ve got a couple of choices to make for how you’ll display your pretty paper flowers:
- Leave them like this
- Display them in a pretty vase, bottle or mason jar
- Wrap them in brown packing paper to replicate real flowers from a florist
And you’re done! We hope you like the swirl effect of these easy DIY paper roses!


Easy DIY Swirl Roses
If you’re new to paper crafts then you’ll love how simple these swirl paper roses are to make.
Materials
- Paper or cardstock
- Kebab sticks or cake pop sticks
- (Optional) Green paint, coloured ribbons and brown packing paper
- (Optional) Vase, bottle or jar
Tools
- Scissors
- Glue
- Sellotape
Instructions
- Cut a large circle in your paper or cardstock. One sheet of A4 should be enough for two paper roses.
- Start cutting the circle in a swirl formation. Try to keep your swirls even!
- Stop when you reach the inner circle leaving roughly one inch of paper uncut.
- Starting at the end of the swirl on the outer edge, roll your cardstock or paper in tight rolls following the swirl pattern.
- Continue rolling until you only have the uncut end left.
- Add some glue to this uncut end.
- Gently release your grip on the rolled part of the flower so it unravels ever so slightly. But only a little; this is one instance when you don’t want to lose your rolls!
- Wrap the glued end around the bottom of your flower. You should find that the end is now slightly pointy.
From here, you have a few options depending on what you want to do with your paper flowers.
If you want to decorate a table or shelf with them or maybe drop them on the floor for someone to follow, then you’ve just got one last step:
- Cut the pointy end of the flower roughly 0.5 centimetres from the bottom so that it has a flatter edge making it easier to stand your flowers upright on their own.
But if you want to turn your DIY paper roses into a small posy or bouquet, follow these steps:
- Cut the pointy end of the flower; this time so it has a small hole in the bottom of it to thread your stick through. These will be your "stems".
- If you want to make your stems look more realistic, then you could paint them green, wrap green ribbon around them or use green pipe cleaners. But if your roses will be hidden inside an opaque vase then you can skip this step.
- Poke your stick through the hole you’ve just made. But be careful not to poke the stick in too far or too forcefully as you might push your inner swirl out of the flower! You shouldn’t need to push your stick more than half an inch inside.
- Glue or sellotape your stick in place. Don’t worry if the ends look a little messy right now because…
- It’s time to decorate with some pretty ribbon! Wrap an elastic band around your flowers so that you’ve got a sturdy posy or bouquet and tie the ribbon around it afterwards to cover the band.
And you’re done! We hope you like the swirl effect of these easy DIY paper roses!
Notes
1. Match your ribbon to the occasion for that something extra… pastel pinks, yellows and greens for spring, reds and golds for Christmas or just go with your recipient’s favourite colour!
2. These swirl roses look great as they come or you can display them in a pretty vase, bottle or mason jar or wrap them in brown packing paper to replicate real flowers from a florist.
I hope you have fun making these pretty DIY paper roses! Fancy sharing a photo of them when you’re done? Tag me on Instagram @houseofmahalo so I can see your makes!
Want more paper flower inspiration? Check out these tissue paper pom pom peonies!
Feeling inspired? Share this easy paper flower craft tutorial on Pinterest!

