How To Make A Quick & Easy Notebook (With A Shabby Twist!)
In today’s tutorial, you’ll learn how to make a quick and easy notebook.
But with a shabby twist: aka a gusseted lace pocket at the back that’s perfect for storing sketches, pressed flowers, and any other treasures you want to stow away and use as future inspiration for your journaling or artwork.
Whether you’re brand new to journal making or you’ve made a few journals before, I hope this easy tutorial inspires you to try something new.

What You’ll Need For This Project
This beginner-friendly project uses just a handful of supplies (most of which you likely already have at home), and it’s easy to personalise with your favourite papers and embellishments.
Listed below is everything I used to make this notebook. Feel free to adjust the design to suit what you have on hand:
- One sheet of 12×12 scrapbook paper or cardstock (I used this pad from Stamperia)
- 10 sheets of A4 or Letter paper folded in half for your pages (I used parchment paper for a luxurious and vintage feel)
- Ephemera from my Shabby Script journal kit
- Pretty lace for the back pocket
- A scrap of book page or music sheet for the back pocket
- Needle, thread and awl/pokey tool for the binding
- Glue (I use Collall All Purpose)
- Glue for fabric (I use Beacon 3-in-1)
- Sewing machine (optional – but recommended for the lace pocket at the back)
- Scissors, paper trimmer, scoreboard and bone folder
- Bookbinding cradle (optional – but recommended if you’re struggling with the binding process)
- Additional embellishments for decorating (I used butterfly fussy cuts, a bookplate, brads and one of my labels)
Video Tutorial
Watch this video to see me make the notebook from start to finish:

Measurements & Quick Instructions
- Cut your 12 x 12 paper into two pieces (12 x 8.5 inches and 12 x 3.5 inches)
- Fold the largest piece in half to make a 6 x 8.5 inch horizontal notebook
- Cut the other piece to be 9 x 3.5 inches to make the pocket
- Score 3 sides of the pocket (left, right and bottom) to make half-inch gussets on all 3 sides
Detailed Written Instructions
Step 1: Prep your cover.
Start with 12×12 scrapbook paper or cardstock for the cover. Cut it into two pieces measuring 12 x 8.5 inches and 12 x 3.5 inches.
Fold the largest piece in half to make a 6 x 8.5 inch cover. I folded mine so the book opens upwards, rather than outwards.
If you like, you can ink the edges of your cover to give it a worn, vintage look.
Step 2: Make the gusseted pocket.
Using the other piece from your 12 x 12, trim it so it’s 1 inch wider than the width of your cover.
This is so you can have a half-inch gusset on 3 sides of the pocket to allow for more space inside the pocket.
If you’re following this tutorial exactly, then your pocket piece should measure 3.5 x 9.5 inches.
Now you’re ready to score half-inch gussets on both sides and the bottom. Snip the corners at an angle so the gussets lay better and then fold the gussets into place.
💡 Top Tip: This part takes a little practice, so don’t worry if your first pocket feels fiddly. Once you’ve made one or two, the process becomes second nature.
For a shabby vibe like mine, cover your pocket with a book page or music sheet and add lace on top of that. Avoid glueing over the folded gussets to save on bulk.
If you want your pocket to hold up better over time, I recommend sewing the lace onto the pocket. If you do this, take care not to sew through the gussets.

Step 3: Prep your pages and bind your notebook together.
Gather some A4 or Letter size paper, fold them in half and trim them to fit inside your cover. You want the pages to sit just slightly smaller than your cover for a tidy finish.
Then, use a simple 3-hole pamphlet stitch to bind your pages (also known as a signature) into your cover.
If you’ve not come across this type of binding method before, here are the steps:
- Line up your pages inside the cover and clip everything in place.
- Use an awl or pokey tool to punch three holes through your pages and cover: one in the centre and two others roughly an inch or so from the top and bottom.
- Thread your needle and sew through the centre hole first, then through one outer hole, back through the centre, out through the other end and back in through the middle. Tie a double knot and finish with a bow if you like that look.
- Press down the holes from the outside and ink if needed to hide any white core showing through the cardstock.

Step 4: Add your finishing touches.
Now it’s time to add your finishing touches! You might want to do what I did and decorate the outer and inside covers as well as the pocket.
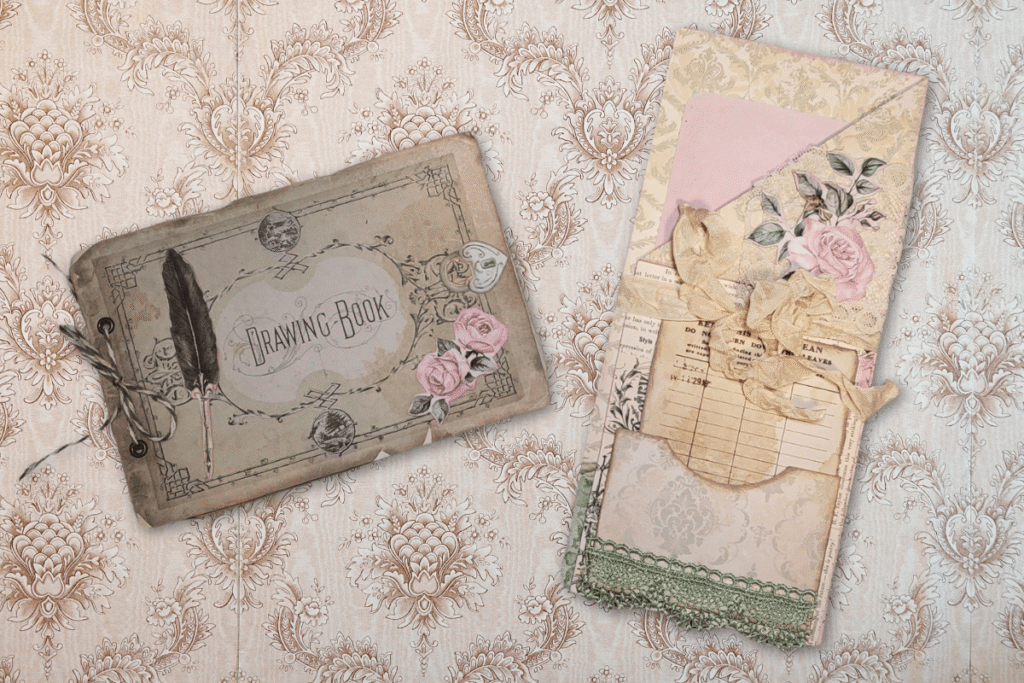
I used a couple of ephemera pieces from my Shabby Script kit (the “Drawing Book” paper and a feather quill) to decorate the front of my notebook. I added some torn washi over the quill to make it look like it’s held in place with it and I glued a couple of butterfly fussy cuts on the inside of the cover.
I then attached a bookplate to the gusseted pocket (using brads) and slipped one of my labels into place to make it clear what this pocket could be used for.
When you’ve finished decorating, you can go ahead and glue the pocket to the inside back cover – applying glue only to the gussets you made, so your pocket can hold more stuff inside it.
And you’re done! I hope you like how your notebook turned out.
Mine will be going into a little bundle with some other goodies:

Finished Look (+ Bonus Shabby Notebook Inspiration)
It’s not just me who’s used my “Shabby” collections to make a vintage-inspired notebook. My Design Team have too! Here’s a quick look at what they’ve made:

Recreate The Look!
As a reminder, you can get the same look as my notebook using my Shabby Script printable papers and this paper pad from Stamperia.
Here’s how you can get your hands on my Shabby Script kit:
- Purchase it as a standalone kit from my Etsy shop.
- Or if you also love the look of the Shabby Lilac collection, you can grab both kits together on Etsy and save 15%.
- If you’re a member of The Mahalo Clubhouse, you already have access to Shabby Script (along with Shabby Lilac and a whole bunch of other kits) as part of your membership.
- Or, for a limited time, you can try a free sample from the Shabby Script kit here.
Discover More Creative Journal Ideas
- 21 Junk Journal Cover Ideas To Inspire You
- 10 Junk Journal Page Ideas To Inspire You
- 15 Junk Journal Tags & Journal Cards To Inspire You
- 10 Easy Junk Journal Pockets: Ideas & Tutorials
- Easy Junk Journal Embellishments: 20+ Examples & Tutorials
- 8 Ways To Use Junk Journal Embellishments (With Examples)
- 10 Junk Journal Binding Ideas & Tutorials To Inspire You
- 19 Hidden Journaling Ideas To Keep Your Writing Private
- 35+ Types Of Junk Journals You Can Try Making
- 14 Creative Things To Do In A Journal Or Notebook
- How To Keep Pressed Flowers In A Journal (7 Easy Ideas To Try!)
- 17 Fun & Festive Christmas Junk Journal Ideas
- 52 Junk Journal Prompts To Help You Write In Your Junk Journal
- Join My Free Facebook Group
- Check Out The Mahalo Clubhouse Membership

Junk Journal Toolkit
📦 What do I need to get started?
If you’ve got paper, glue, scissors and something to bind your pages with (like a needle, thread and an awl or pokey tool), you’re good to go! Check out my essentials vs. nice-to-have supply list for more info.
🤯 I’m overwhelmed by tutorials and ideas. Where should I start?
Start with my free Mini Junk Journal Masterclass. It walks you through the process step-by-step. Even though it focuses on a mini journal, the same tips apply to any size journal.
❓ I don’t understand the terminology. Can you help?
Absolutely! My A–Z Junk Journal Glossary breaks down all those confusing terms and acronyms. Jargon be gone!
🪡 How do you keep your binding neat?
I use my bookbinding cradle to line up my holes and avoid punching too far through the pages. Smaller holes give a neater and more secure binding, and I use this thin upholstery thread for a cleaner finish.
🧵 Do I need a sewing machine?
Not necessarily! A basic sewing machine is helpful for making fabric-covered journals, but strong fabric glue can work just as well. If you stick to paper-based journals or folios, you don’t need one at all. I like the sewn look and making fabric-based journals, so I personally use a simple machine (similar to this) that’s lasted me over 10 years – it’s a trusty part of my toolkit.
🖼️ What digital papers do you use?
I use a mix of my own designs and other favourites. You can see examples here. New to digitals? Check out my mega bundle for a big saving on some of my designs or sign up for my Mahalo Clubhouse membership to get brand new digitals sent to you every month.
📜 What’s the best paper for printing digitals?
I use this 100 GSM Presentation Paper for vibrant and high-quality prints.
🖨️ What printer do you recommend?
I love my Epson Ecotank. It’s affordable, reliable and the ink lasts ages. I used to spend £30 a month on ink – now I refill just once or twice a year for under £30. Check out my detailed review of EcoTank printers to see how much you could save!
🖇️ What glues do you use?
My go-tos are Collall All Purpose, Cosmic Shimmer and Beacon 3-in-1. Here’s how I use each one.
📖 What books are best for junk journaling?
I love using second-hand nature and botanical books. Here are some great titles to look for next time you’re thrifting.