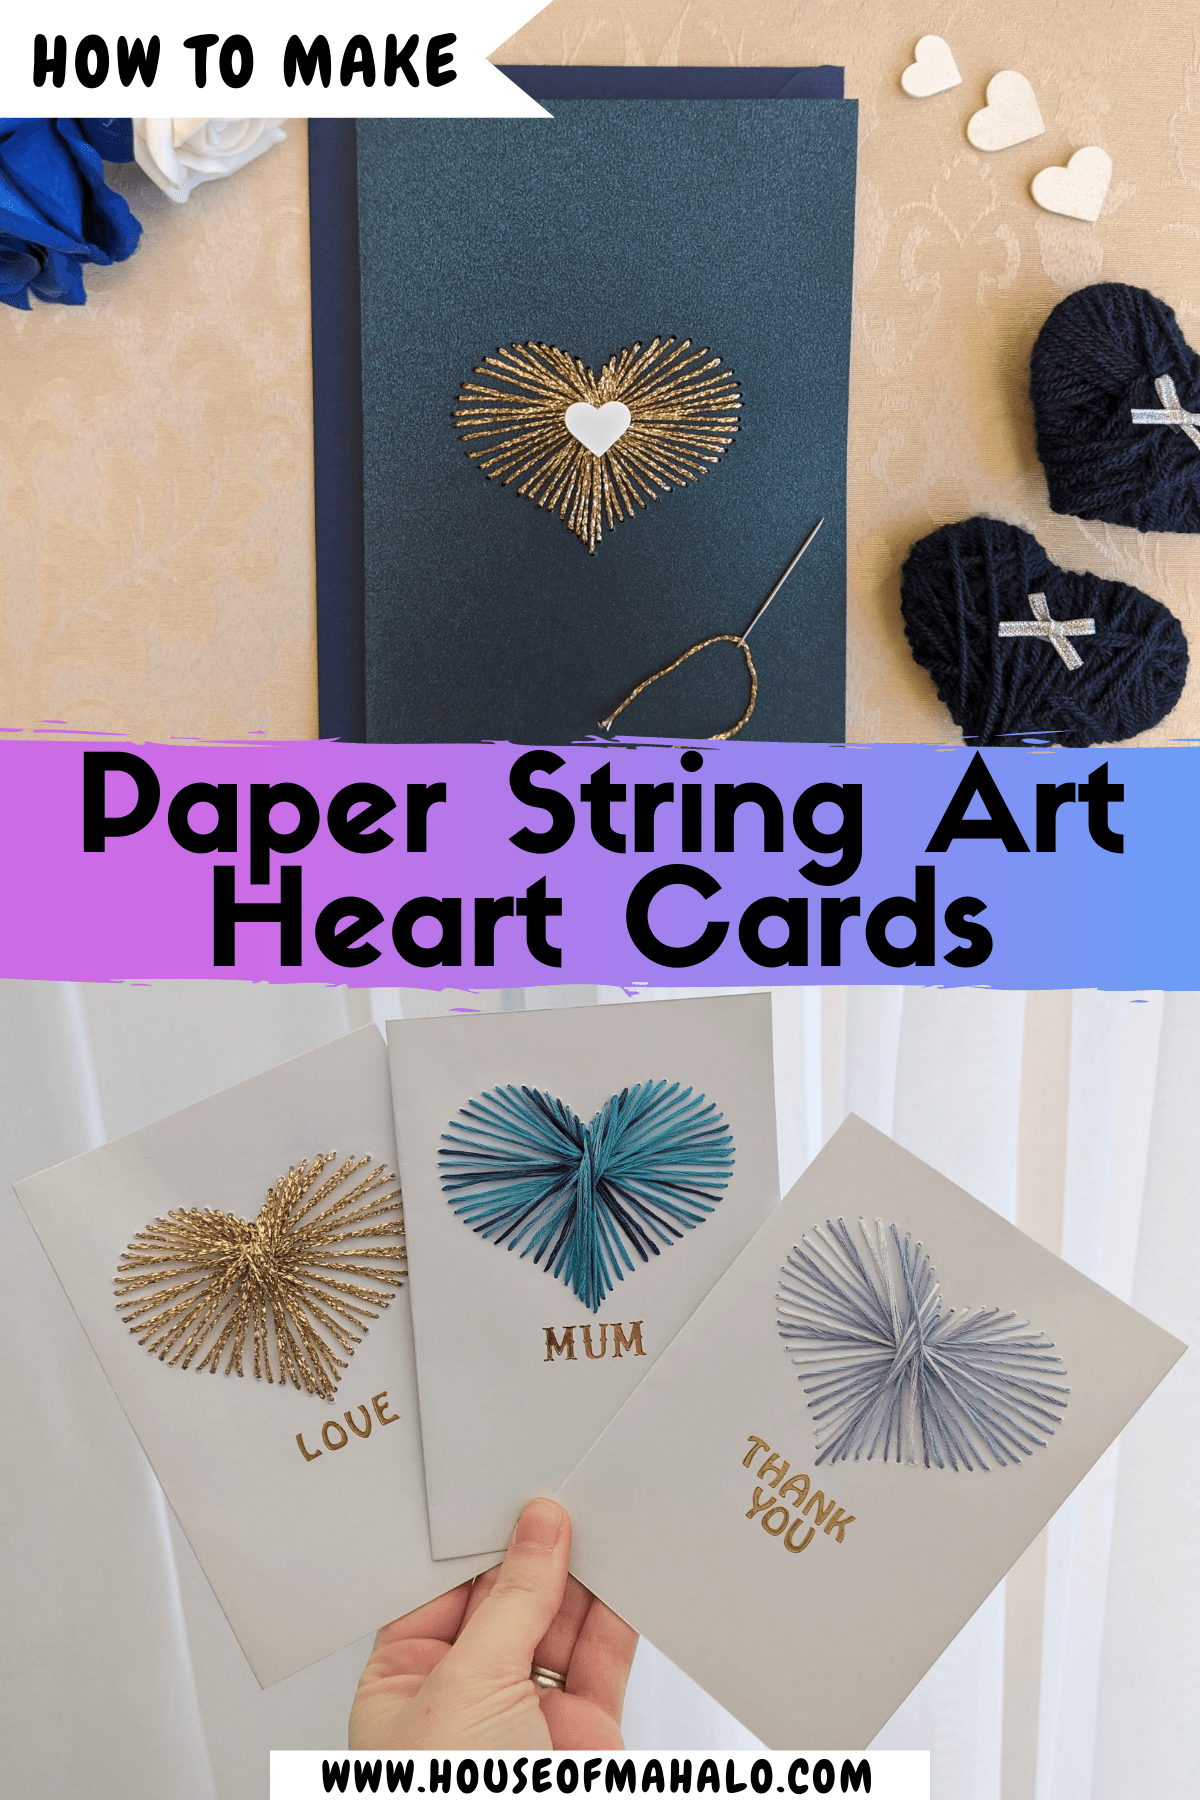
DIY Paper String Art Heart (Easy Embroidered Cards For Valentine’s Day)
If you’ve always wanted to try making a string art heart, but don’t like the idea of hammering nails into wood, then have you thought about trying paper string art?
It’s such an easy craft and all you’ll need is some cardstock, a needle and some thread such as embroidery floss, string or yarn.
Read on to find out how easy it is to make a pretty embroidered card just like one of these:


I used to sell cards and card making kits just like these in my Etsy shop once upon a time. But since my shop is now all about junk journals and vintage paper, I thought I would pass on my tips on how you can make embroidered cards by yourself. Enjoy!
Related: Tutorial: Quick & Easy Regency Letter Folding Technique (Jane Austen’s Method!)
DIY Paper String Art Heart
Supplies needed:
- Cardstock (folded in half if you want to make a greeting card)
- Embroidery floss, string or yarn (I used coloured embroidery floss and sparkly gold yarn for my cards)
- Needle
- (Optional) Mini heart embellishment
To turn your paper string art into a pretty embroidered card, you’ll also need:
- Extra cardstock
- Double sided tape
- An envelope
- Folded paper insert (I just used white copy paper folded in half for mine)
Instructions
Step 1: Trace a heart shape onto your cardstock with a pencil.
Either trace a heart shape onto your cardstock using a pencil or you could draw around something heart-shaped.
Step 2: Mark your holes.
Using your needle or a pokey tool, mark holes in your cardstock that follow the shape of your heart. You should leave enough space in between each hole to prevent tearing the paper (about half a centimetre should do it).
You’ll also need to make five holes in the middle of your heart – as shown in this image:
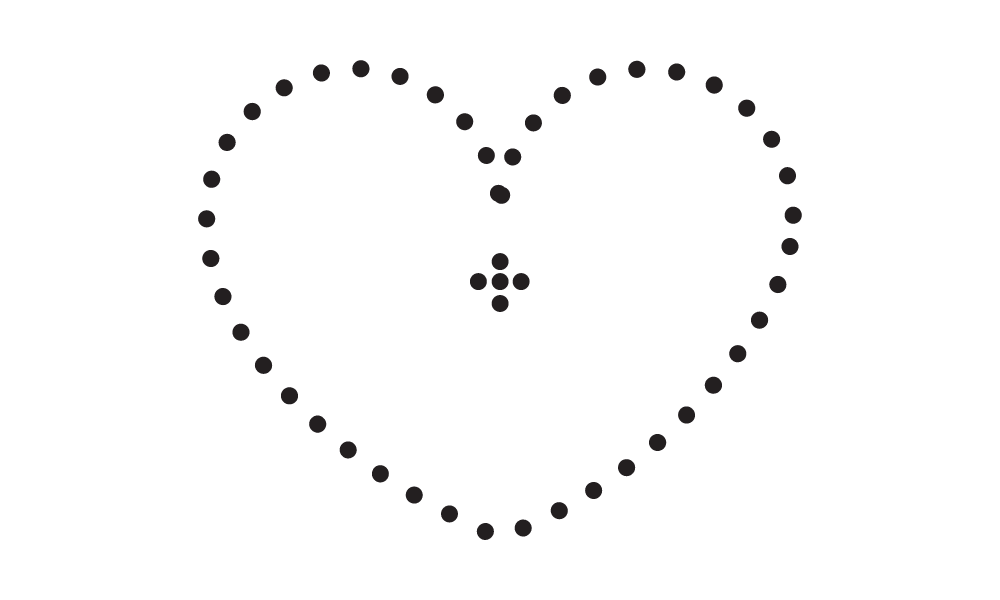
Remember to rub out your pencil markings before you start stitching!
Related: Quick & Easy DIY Heart Map Art
Step 3: Thread your needle.
I usually thread about 20-30 cm of thread at a time. You may need to wet the end of the thread to help you thread it through the needle, or use a threader if you have one.
Step 4: It’s time to start stitching!
Starting at the back of your cardstock, bring your needle up through the top hole and back down through the closest hole in the middle.
I prefer to use the “no knot” method for a tidier finish (look for Youtube videos online if you’re brand new to sewing.) And that’s your first stitch done!
Step 5: Continue stitching.
The rest of the stitches follow a clockwise direction. Come up through the back of the next outer hole and down through the same middle hole as before. Try not to let your threads cross over unless that’s the look you want to go for. Repeat for the following 8 or 9 holes (approx) before moving on to the next hole in the middle.
Your embroidered heart should start to resemble something like this:

Note: When you start to run out of thread, you’ll need to thread a different piece onto your needle. But you first need to cast off the existing thread.
With your needle at the back of your cardstock, carefully thread the end of your needle underneath some of your other stitches and trim any excess thread. You’ll want to leave about half an inch of thread leftover to stop any stitches from coming loose.

Step 6: Continue stitching.
To complete your heart, keep stitching in the same way as before but use different holes in the middle. For example, your next 8 or 9 holes will use the middle right hole, the next set will use the bottom hole, the next set will use the centre middle hole and the next lot will use the left middle hole.
Keep going until all of your holes are filled. If you have any holes along the outer rim of the heart that haven’t yet been filled, then you can bring the thread down through any of the closest holes in the middle.
Once you’ve filled in all of your holes, your heart should look a little like this:

Step 7: (Optional) Add a stitched border to your heart.
If you want to add a border to your heart, then this is done by backstitching around the outside of it. Bring your needle up through your first hole, down through the next, and back up through the first hole.
Keep going until you have a border around your heart – like this:
Related: DIY “A Year Of Dates” Gift For Your Other Half
Step 8: (Optional) Add a heart embellishment.
If you’d like your heart to look like a sunburst coming out of a heart in the middle, then this can be done by glueing a mini heart embellishment onto the front (like you can see in the photo above). This also covers up the holes in the middle in case you don’t like the look of them.
How to turn your paper string art into a pretty embroidered card
If you want to send your paper string art to someone as a greeting card, such as for Valentine’s Day, an anniversary or Mother’s Day, then the cardstock you stitched onto needed to be folded like a greeting card.
You can then open up the card and stick an extra piece of cardstock onto the back of your stitched heart using double-sided tape. I usually put a bit of tape along each side to secure it.
Glue your folded paper insert inside your card using a glue stick. I usually just put a dab of glue on all four corners.
Here’s how mine looks inside:


You could even add stickers beneath your heart to personalise your card.
Here’s how some of my other cards turned out. Notice I didn’t use middle holes in these examples.
That’s another option open to you. Don’t make the middle holes and instead move from one side of the heart to the other with your thread and keep repeating around your heart. Cute, huh?
Related: How To Make Your Own Embroidery Pattern (Even If You Can’t Draw!)
And that’s all there is to it! I hope you have fun making your paper string art hearts and embroidered cards. Any questions? Just let me know!
Do you know someone who might like this tutorial? Why not share it with them using one of the buttons below?