What To Do With Your Finished Cross Stitch: 15 Interesting Ideas
Are you wondering what to do with your finished cross stitch pictures – beyond simply framing them? Fabulous! You’re in the right place.
Read on for 15 interesting ideas on what to do with your finished cross stitch pictures, which should suit all levels – from beginner crafters to the more experienced.
What To Do With Your Finished Cross Stitch: 15 Interesting Ideas
1. Frame your completed cross stitches
Okay, okay, so framing your cross stitches is nothing new. But if you’re bored of simply using picture frames, then why not change things up a bit?
There are a few different ways to frame your cross stitches.

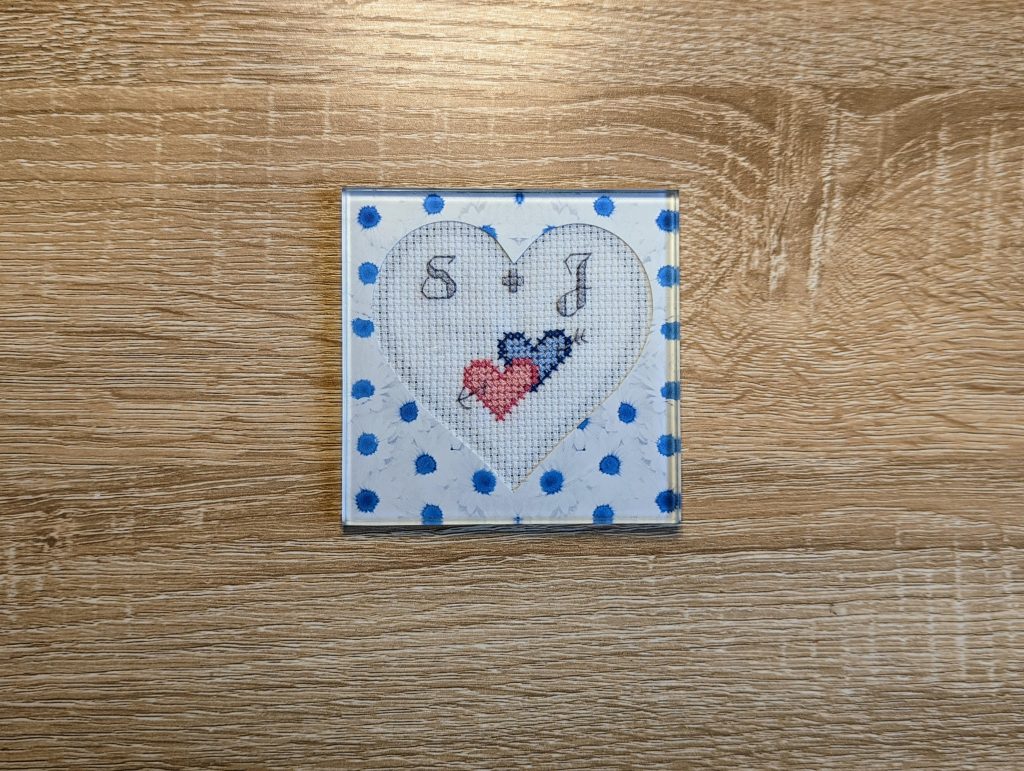
You could frame your cross stitches using an embroidery hoop. You could even paint the hoop or wrap it in ribbon to give it a splash of colour.
Or, you could also use a canvas and mount your picture onto that instead.
Alternatively, you could even try stitching your picture on a canvas and use that to frame your handiwork in a new and novel way.
Wondering how I made the embroidered heart card in the picture above? Check out my tutorial here >>
2. Turn your finished cross stitches into keyrings
For this project, you’ll need some photo keyrings, which are simple enough to find online.
You can then simply frame your cross stitches inside the keyrings. They also make thoughtful handmade gifts for your friends and family.
3. Make a key holder
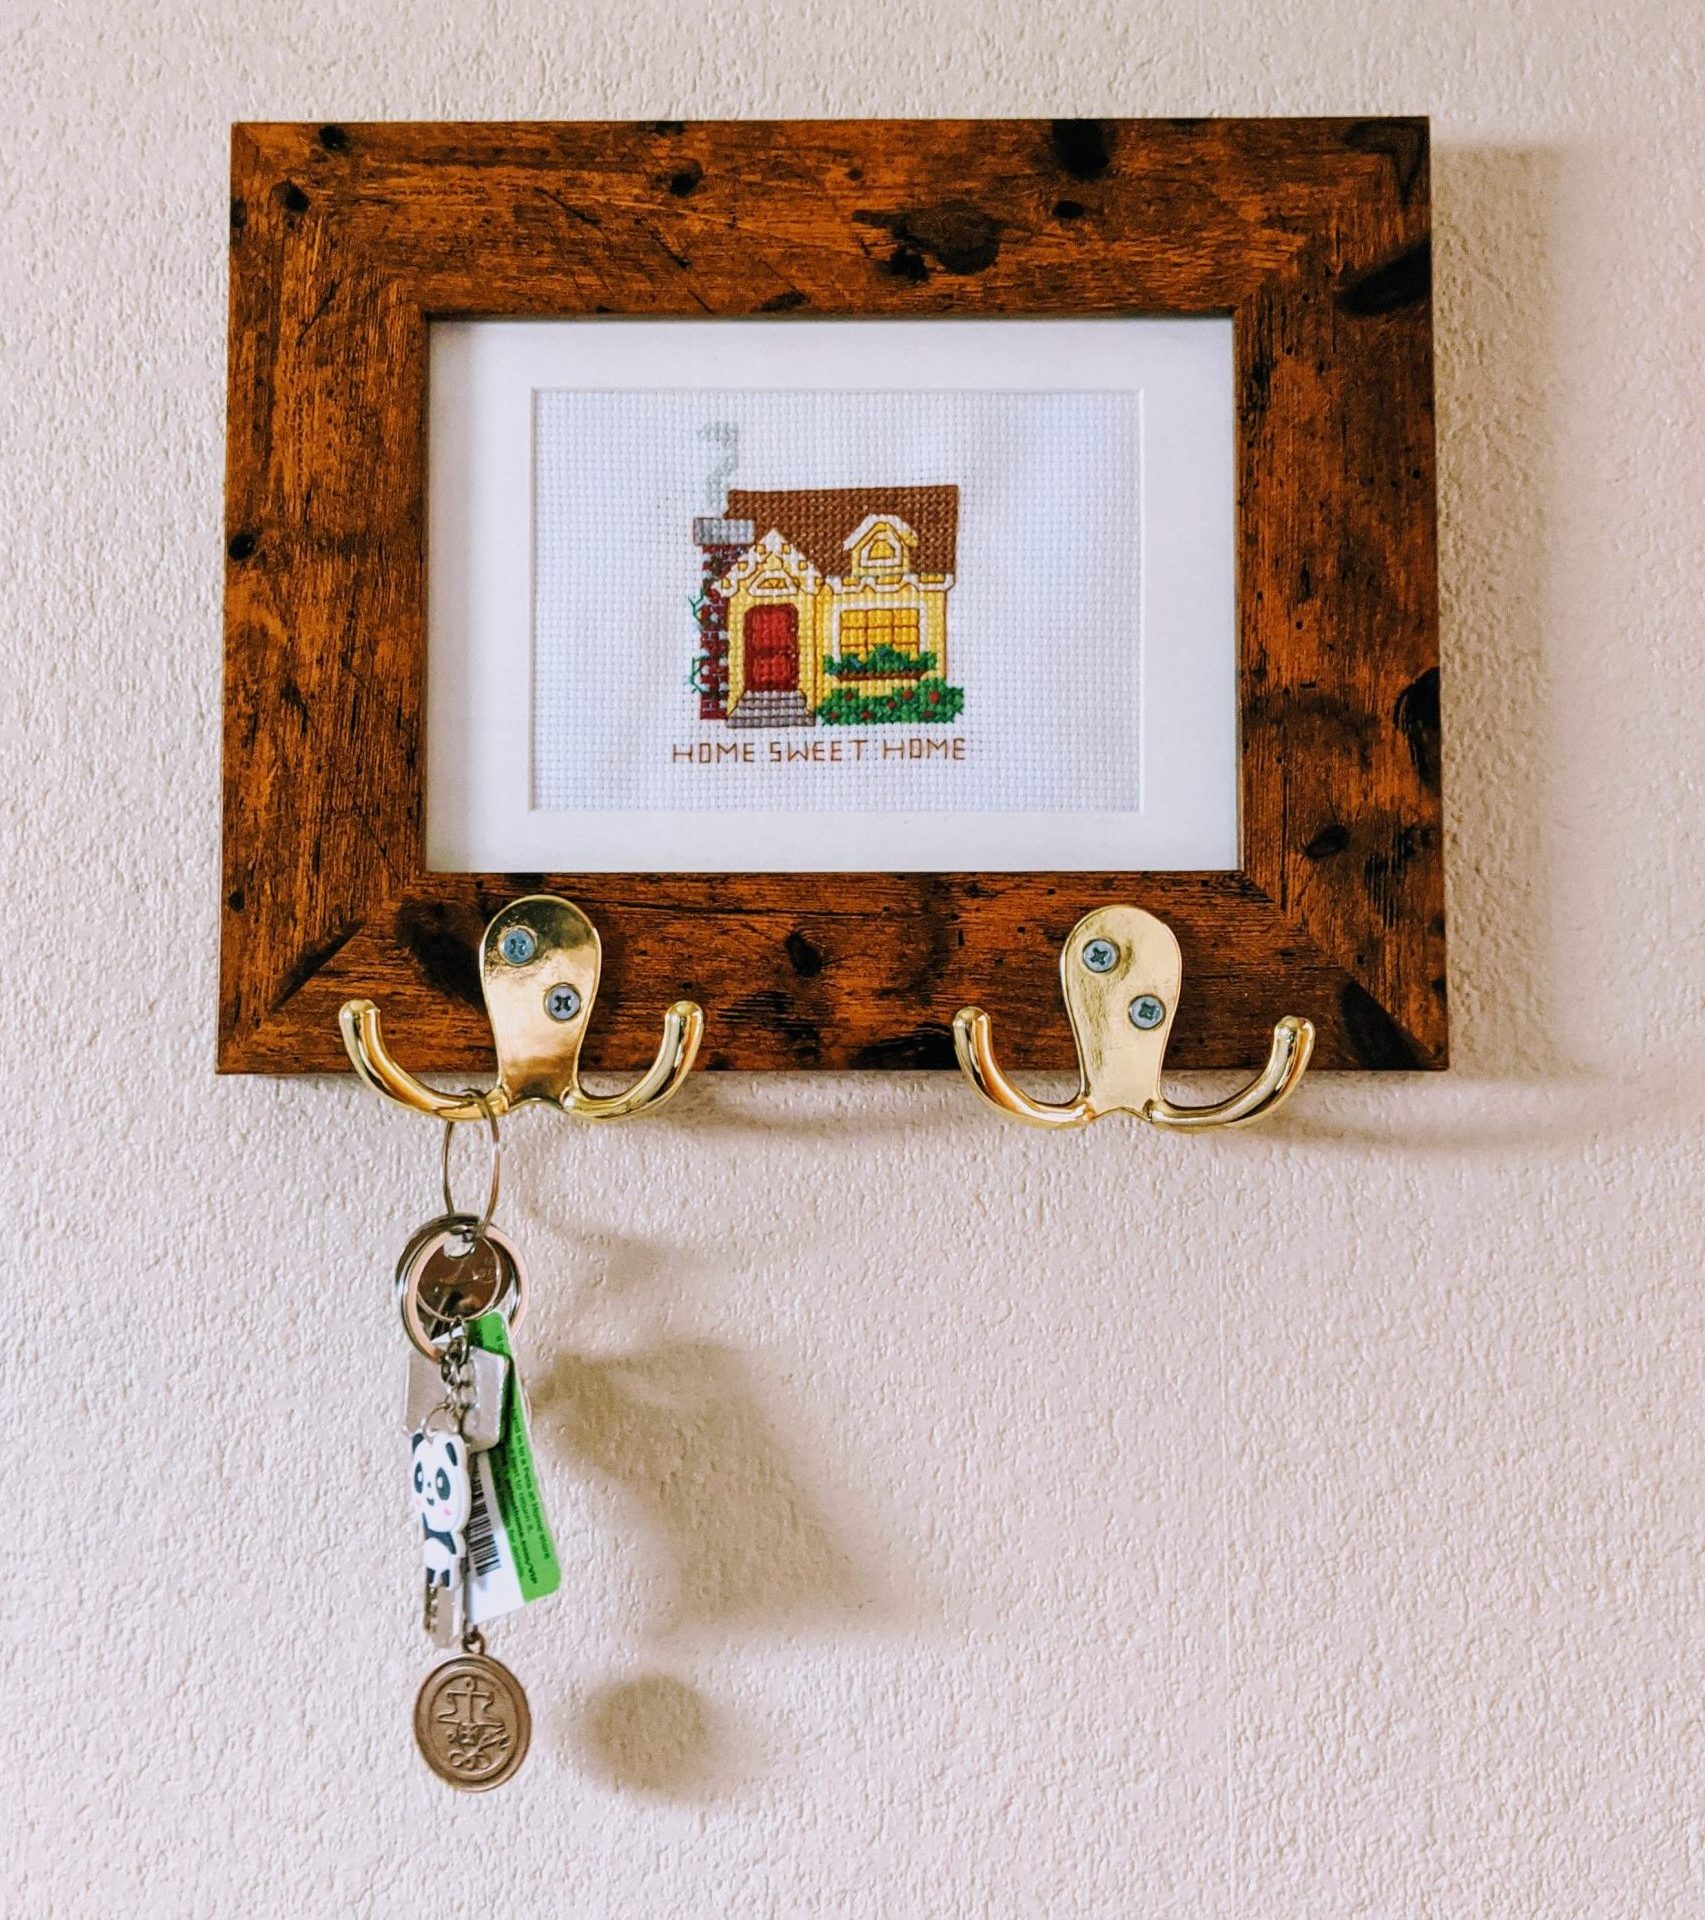
Speaking of keys, here’s a simple and unique idea for your completed cross stitches: make a key holder!
All you need is a picture frame, some hooks, screws and a way of mounting your frame on the wall – and hey presto! – your finished cross stitch will not only look decorative, but it’ll be useful as well.
I made a “Home Sweet Home” cross stitch picture for our key holder, but any picture you like will work just fine for this project.
Check out my easy tutorial now >>
4. Turn your completed cross stitches into cushions
If you’ve made a large cross stitch picture, then why not turn it into a cushion or throw pillow?
It’s easy enough to do if you have a sewing machine as you can use your completed cross stitch picture as a piece of fabric like normal.
You can attach some iron-on interfacing to the back of it to help protect your stitches, sew it onto another piece of fabric and add a zip.
Here’s a simple tutorial you can follow >>
Note: I imagine making a pin cushion out of your completed cross stitch pictures would also work in a similar way to this.
5. Make a coaster
For this project, you’ll need some photo coasters, which are fairly easy to find online.
You can then frame your finished cross stitch inside a coaster. These also make great homemade gifts.
6. Store your finished cross stitches in a memory book
If you’ve run out of friends and family to give cross stitch pictures to, or your home is fit to bursting, then you may need to think about storing your completed cross stitches.
Wondering how to store them? You have a couple of easy options.
You could pop them inside a folder and protect them with plastic wallets. You could then swap out your framed cross stitches through the year or simply flip through the folder to remind yourself of your handiwork.
Or, if you want to kick things up a notch, then you could learn how to make a memory book and store your pictures inside that instead.
There are plenty of tutorials online to help you with this option.
7. Make a calendar
If you like the idea of switching out your finished cross stitches every month, then you might like to make a DIY calendar.

All you’ll need is a double-aperture frame, which can house your monthly picture next to or above a printable calendar.
You may want to remove the glass from the side you plan on writing on or you can just buy a chalk pen that can write on the glass and rub off easily with a wipe.
Alternatively, you can make things even simpler and just hang a printable calendar beneath your picture.
8. Make a card for someone special
Why not frame your cross stitches inside an aperture card to make an easy DIY greeting card?

It’s simple enough to do and your friends and family will love the personalised touch. They can even frame their cross stitch picture once the celebrations are over.
9. Make a pencil case
A DIY cross stitch pencil case works similarly to the cushion option mentioned earlier.
The main difference is that you’ll also want to line your pencil case so that nothing catches on your stitches (or the fusible interfacing) when you pull things in and out.
Here’s a handy tutorial to show you how to make one >>
10. Make a cross stitched bookmark
Once you’ve finished your cross stitch, you could turn it into a bookmark (just like this wizard one my mum made for me many moons ago).
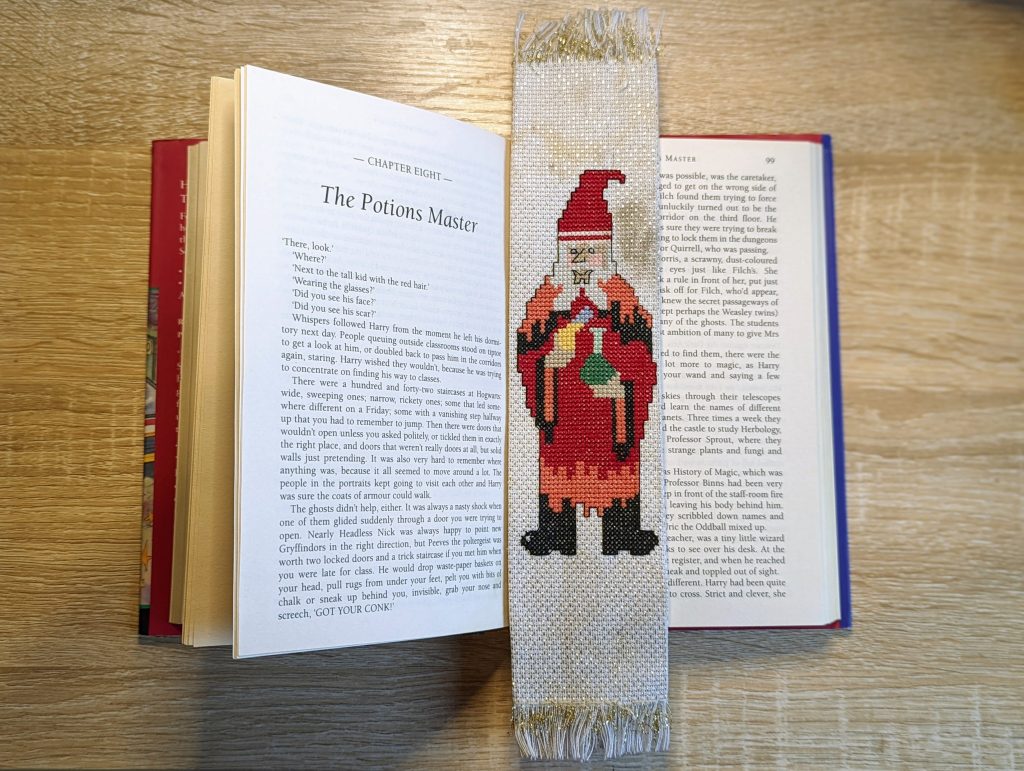
They’re simple enough to make. All you need to do is fold both sides of your Aida backwards, iron them flat and then you can stitch or glue the two sides together on the back of your bookmark.
You can also do some fun things like adding tassels or fringing your Aida.
Check out this tutorial to make your own >>
11. Make a quilt out of your completed cross stitches
If you like the idea of stitching multiple smaller pictures rather than one large picture, then you might enjoy making a quilt out of your cross stitch pictures when you’ve finished stitching them.
This project follows similar steps as the cushion cover and pencil case ideas, but with the added step of sewing fabric between each cross stitch picture to join them all together.
See the full instructions here >>
12. Make a Christmas tree decoration

There are several ways you can use your completed cross stitch pictures to make Christmas tree decorations.
You might like to add a loop and stuff your decoration like the ones in this tutorial.
Or, you might like to use mini embroidery hoops to frame your cross stitches and hang those from the tree instead.
You can even buy kits, which involve stitching your picture onto a shaped piece of wood with holes in it. This is a great option for beginners.
13. Make some unique artwork
With the help of a multi-aperture picture frame, you can create a unique piece of artwork using your finished cross stitch picture as the centrepiece.
It’s up to you how you go about doing this.
For my artwork, I’ve stitched a couple of cute cupcakes, which I’ll then frame on either side of a poem my Dad read at my wedding. The whole thing will then take pride of place in our kitchen.
But you can probably get much more creative than that!
14. Use your completed cross stitches on the cover of a journal
Here’s another idea, which fuses my love for junk journals and hand-stitched projects.
One day, I plan on using a finished cross stitch on the cover of a journal (much like I would with an image or fabric patch).
You could even glue small cross stitches onto some cardstock and use those as pockets or other ephemera inside the journal.
I’ll be sure to share photos just as soon as I’ve tried this one myself!
15. Sell your completed cross stitches and designs
And finally, if you’ve exhausted all other options or you want to make money from your crafting hobby, then you may be able to sell your completed cross stitches on websites like eBay and Etsy or at a crafts and gifts fair/market.
You’ll need to take note of copyright policies if you’ve used someone else’s design, though, as most don’t allow you to use their designs for commercial gain.
However, if you’ve come up with your own design, then you’re well within your rights to sell the completed cross stitch picture and even the design itself for others to use. Etsy is a great place for that.
READ NEXT: How To Make Money From Crafting
And there you have it – 15 ideas for what to do with your finished cross stitch pictures. I hope you’ve found them helpful and inspiring. Have you got any other ideas you’d like to share with me? Drop me a line in the comments below…
Did you like this list of finished cross stitch ideas? Why not pin or bookmark it now, so you can read it again later?
You are a creative rockstar! I am looking forward to watching your YOUTUBE channel and looking through all of your ideas. Quick question – I just signed up for your blog but am not sure why I had to agree to receiving personalized ads in order to do so. Any information you can provide about that?
Hi Wendy,
Thanks so much for your lovely comment – I hope you enjoy my other blogs and videos 😀
One of the platforms I use for collecting email addresses is called Grow and it’s owned by a company called Mediavine, which is an ad network that partners with bloggers and publishers to serve ads on our sites. I use them for my travel blog, which is my main job 🙂
While the personalized ads part doesn’t apply to my House of Mahalo website yet, I do hope to have ads on my website in the future to help with the running costs of keeping the site up. So from a privacy and GDPR standpoint, Mediavine/Grow wants us to have consent to show ads to our readers.
I hope this helps explain things a bit better – please don’t think it means you’ll start receiving ads from me in my emails or anything like that 🙂 xoxo